Deep Dive Into Oauth and Openid Connect
Welcome to the second part of the Identity and Access Management (IAM) trilogy. Today, we will explore the best practices for two key protocols: OAuth 2.0 and OpenID Connect (OIDC). The two protocols are very like each other, but still complex on a technical level. Many of you have used one or the other at some point.
There are a lot of tutorials about this topic, especially OAuth. But a lot of them contain a lot of jargon and false information. There are two reasons for this. First, authentication and authorization are themselves complex topics. They require a lot of background information to even begin with. Second, the protocols have a lot of different ways for implementation. This makes it hard to deliver a good tutorial that covers most aspects of the technology. I wanted this article to be clear and accurate for software developers and beginners. So if you work in or around tech, this article is for you.
Prerequisites
A Small Trip Down Memory Lane
Authentication has been key in software development since the dotcom boom, and it remains vital today. Yet, the identity use cases back then were pretty simple compared to today. Log in a user using a simple form. Then, keep the session alive with a cookie. Also, enable single sign-on across different sites if multiple applications share the same users. Nothing too crazy.
You could manage this by building your own authentication and authorization systems. But as technology advanced, it became more complex. After the smartphone launched in 2007, new issues came up. People began to consider how to manage users more simply and efficiently.
With the invention of the smartphone, we needed a way to log users in on mobile devices. Those devices, more often than not, could not save cookies, which meant there had to be another solution.
As apps became more interconnected with each other, there had to be a way to transfer user information from a third-party app.
In 2012, developers created OAuth 2.0 to address new use cases. A 1.0 version had come out in 2007 but had limited features. Practical examples are:
A photo editing app wants permission to access a user’s Google Drive files.
A CI/CD tool needs to push to a GitHub repository on your behalf.
A backend service wants to fetch data from an API using a machine-to-machine token (client credentials flow).
OAuth 2.0 In Its Core
So we know that we need a new protocol enabling us to check if a user is authorized to do certain things. Let’s take a look at how the protocol actually works. Let’s use a clear example. Imagine our photo editing app is asking to access a user’s Google Drive files.
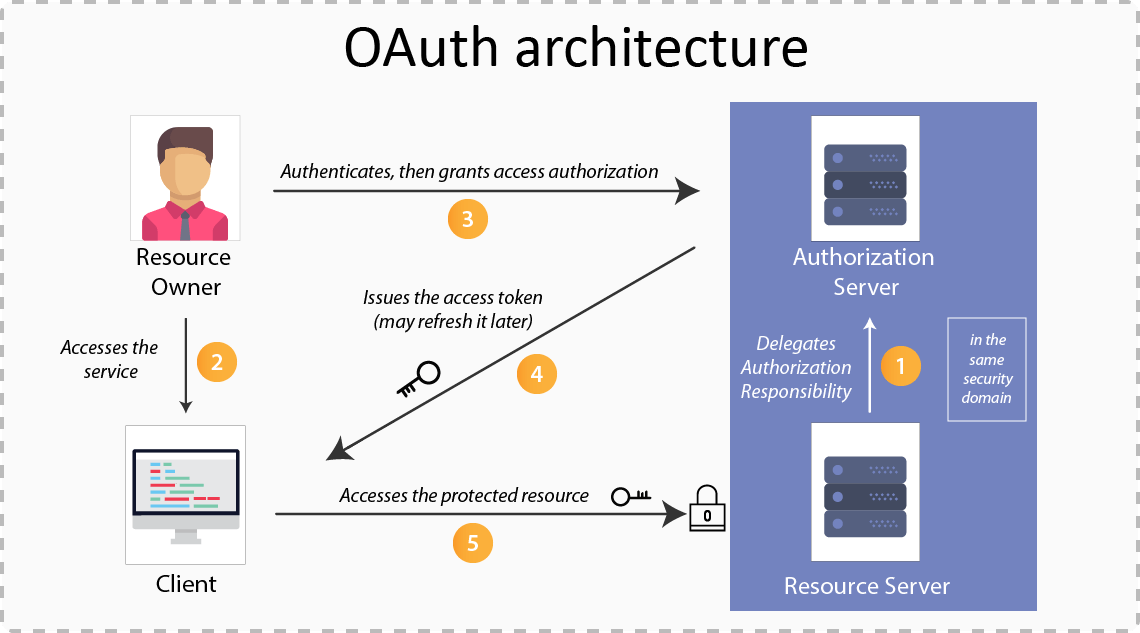
First things first, the photo app requests access to some resource from the OAuth 2.0 server. This is where the user gets redirected to the OAuth server, which is also called the authorization server. The authorization server does not hold the requested permission that our photo app has requested. Its sole purpose is to verify that the user is who he says he is. The user enters his credentials in the authorization server front end. After he clicks submit, Google’s OAuth server returns an access token to the client (if the credentials match a database entry).
The access token can then be used to make a request to the Google resource server, which holds the data our third-party application wants access to. We send a request to the resource server with our access token. The server checks with the authorization server to see if the token is valid. If it is, the server returns the requested resource.
Of course, there is a lot more to it, but this is pretty much how it works at a high level. There are, of course, more security checks. The authorization server checks the scope of the requested data. It ensures the requested resources match the user’s consent. If everything checks out, the requested resources, in this case, files from Google Drive, are returned to our photo-editing app.
Limitations of OAuth 2.0
That’s all good and well, but there is one small problem we haven’t addressed so far. OAuth is only designed with authorization in mind. It should not be used for authentication. We learned the difference between those two in my last blog post. In short, authentication answers the question “Who are you?” while authorization answers the question “What are you allowed to access?”.
As I said, as long as we stay with authorization, OAuth is fine. This also matches our use case in our example with the photo editing app. The only thing we need is permission to access files from Google Drive. No more, no less.
But there is another very popular use case. Imagine that we would not only want to access the files on the drive, but to actually sign in with our Google account to our app. You can even see this in action on all apps having a button “Sign in with Google”, or something similar. In this case, we don’t want to authorize the user anymore, but to authenticate him. This means we will also need some user info to save into our database, like name, email, and so on. That’s where OpenID comes into play.
Meet OpenID Connect
For that reason, organizations used OAuth even for the authentication of users for a pretty long time. This required some hacks and workarounds, and it certainly was not within the best practices it should have been. But until the release of OpenID in 2014, there was no other solution. This changed with the release of OpenID.
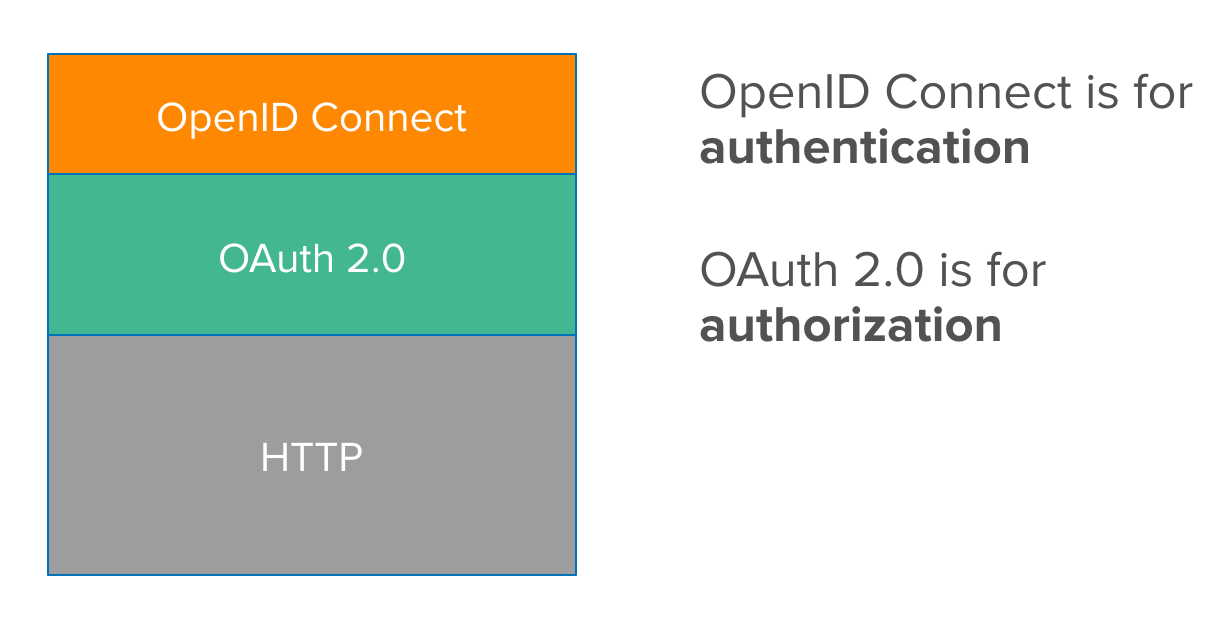
OpenID Connect adds an identity layer on top of OAuth 2.0. This helps clients, like websites or apps, confirm a user’s identity. Where OAuth 2.0 governs access to your data, OpenID establishes your identity based on the access granted by OAuth 2.0.

But, OpenID is not its own protocol, which is a common misconception. It builds on OAuth 2.0. It adds a new scope parameter, “openid,” during the initial request from the client to the authorization server. It also introduces a new endpoint, “/userinfo,” on the resource server. This endpoint returns the user information for the requester.
Conclusion
I hope you gain valuable information on how IAM works across applications. It is pretty simple once you understand the big picture. OAuth 2.0 handles authorization for third-party apps. OpenID Connect builds on OAuth 2.0 by adding authentication.
In the final part of the trilogy, we’ll explore what to do after a user logs in. We’ll discuss how to store the session in a secure and efficient way.